nueijeel
[Android] Layout 종류와 특징 본문
2023.06.07
Layout은 View 객체를 포함하는 그릇 역할을 하는데, 이 Layout 종류에 따라 뷰를 배치하는 방식이 다르다.
1. LinearLayout
LinearLayout은 View를 가로 또는 세로 방향으로 나열하는 레이아웃 클래스다.
Layout의 orientation이라는 속성을 horizontal로 지정하면 가로 방향으로 뷰가 나열되는 레이아웃을, vertical로 지정하면 세로 방향으로 뷰가 나열되는 레이아웃을 생성할 수 있다.
<?xml version="1.0" encoding="utf-8"?>
<LinearLayout xmlns:android="http://schemas.android.com/apk/res/android"
    android:layout_width="match_parent"
    android:layout_height="match_parent"
    android:orientation="horizontal">

    <Button
        android:id="@+id/button"
        android:layout_width="wrap_content"
        android:layout_height="wrap_content"
        android:layout_weight="1"
        android:text="Button" />

    <Button
        android:id="@+id/button2"
        android:layout_width="wrap_content"
        android:layout_height="wrap_content"
        android:layout_weight="1"
        android:text="Button" />

    <Button
        android:id="@+id/button3"
        android:layout_width="wrap_content"
        android:layout_height="wrap_content"
        android:layout_weight="1"
        android:text="Button" />
</LinearLayout>
orientation 속성을 horizontal로 지정한 LinearLayout에 버튼을 배치하면
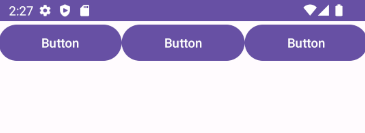
위와 같이 가로로 버튼이 나란히 배치된다.
반대로 android:orientation="vertical"로 지정하면
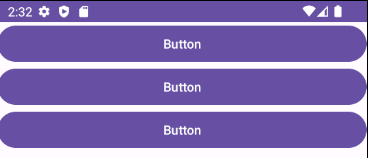
세로 방향으로 버튼이 배치된다.
만약 뷰를 가로로 배치해야하는 부분과, 세로로 배치해야하는 부분이 한 화면에 있어야 한다면
<?xml version="1.0" encoding="utf-8"?>
<LinearLayout xmlns:android="http://schemas.android.com/apk/res/android"
    xmlns:app="http://schemas.android.com/apk/res-auto"
    xmlns:tools="http://schemas.android.com/tools"
    android:layout_width="match_parent"
    android:layout_height="match_parent"
    android:orientation="vertical"
    tools:context=".MainActivity">

    <LinearLayout
        android:layout_width="match_parent"
        android:layout_height="match_parent"
        android:layout_weight="1"
        android:orientation="horizontal">

        <Button
            android:id="@+id/button1"
            android:layout_width="wrap_content"
            android:layout_height="match_parent"
            android:layout_weight="1"
            android:text="Button" />

        <Button
            android:id="@+id/button2"
            android:layout_width="wrap_content"
            android:layout_height="match_parent"
            android:layout_weight="1"
            android:text="Button" />

        <Button
            android:id="@+id/button3"
            android:layout_width="wrap_content"
            android:layout_height="match_parent"
            android:layout_weight="1"
            android:text="Button" />

        <Button
            android:id="@+id/button4"
            android:layout_width="wrap_content"
            android:layout_height="match_parent"
            android:layout_weight="1"
            android:text="Button" />
    </LinearLayout>

    <LinearLayout
        android:layout_width="match_parent"
        android:layout_height="match_parent"
        android:layout_weight="1"
        android:orientation="vertical">

        <Button
            android:id="@+id/button5"
            android:layout_width="match_parent"
            android:layout_height="wrap_content"
            android:layout_weight="1"
            android:text="Button" />

        <Button
            android:id="@+id/button6"
            android:layout_width="match_parent"
            android:layout_height="wrap_content"
            android:layout_weight="1"
            android:text="Button" />

        <Button
            android:id="@+id/button7"
            android:layout_width="match_parent"
            android:layout_height="wrap_content"
            android:layout_weight="1"
            android:text="Button" />

        <Button
            android:id="@+id/button8"
            android:layout_width="match_parent"
            android:layout_height="wrap_content"
            android:layout_weight="1"
            android:text="Button" />
    </LinearLayout>

</LinearLayout>
위 코드와 같이 LinearLayout내에 구간별로 LinearLayout을 담아서 화면을 구성하면 된다.
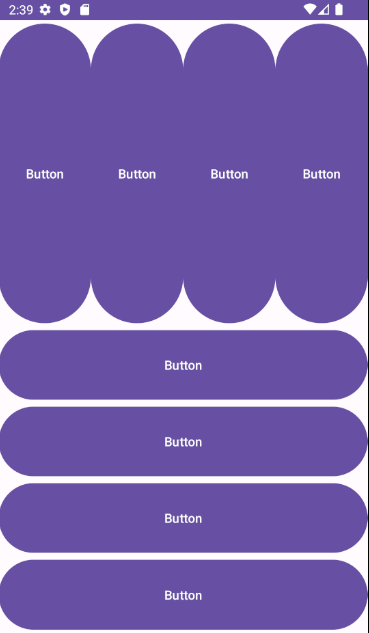
전체를 감싸는 LinearLayout내에 orientation이 horizontal인 레아이웃과 vertical인 레이아웃이 중첩되어 있고, 각 레이아웃 안에 버튼들이 배치되었다.
그런데 코드를 살펴보면 버튼들에 layout_weight 속성이 지정되어 있다.
이 속성은 뷰가 차지하는 여백의 비율을 의미하는데, 같은 레이아웃에 있는 뷰끼리만 영향을 받는다.
중첩된 레이아웃 예제를 예로 들어보면
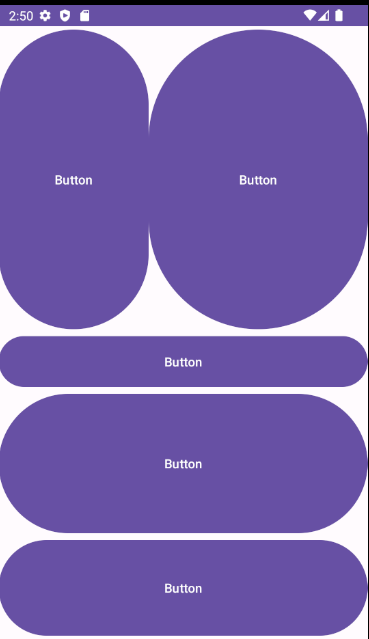
horizontal 속성 LinearLayout에 배치된 두 버튼의 layout_weight값을 각각 1, 2로 주고
vertical 속성 LinearLayout에 배치된 세 버튼의 layout_weight값을 각각 1, 7, 4로 준 모습이다.
레이아웃끼리는 서로 영향을 받지 않고, 하나의 레이아웃 내에 배치된 뷰 끼리만 비율이 변화된다.
2. RelativeLayout
RelativeLayout은 상대 뷰의 위치를 기준으로 해당 뷰를 정렬하는 레이아웃 클래스이다.
각 속성에 대해 기준이 될 뷰의 ID 값을 입력해 지정하기 때문에 속성별 기능을 잘 알아야 한다.
< 배치 속성 >
| layout_above | 기준 뷰의 위쪽에 배치 | layout_alignParentTop | 기준 뷰와 위쪽을 맞춤 |
| layout_below | 기준 뷰의 아래쪽에 배치 | layout_alignParentBottom | 기준 뷰와 아래쪽을 맞춤 |
| layout_toLeftOf | 기준 뷰의 왼쪽에 배치 | layout_alignParentLeft | 기준 뷰와 왼쪽을 맞춤 |
| layout_toRightOf | 기준 뷰의 오른쪽에 배치 | layout_alignParentRight | 기준 뷰와 오른쪽을 맞춤 |
| layout_centerHorizontal | 부모의 가로 방향 중앙에 맞춤 | layout_centerVertical | 부모의 세로 방향 중앙에 맞춤 |
| layout_centerInParent | 부모의 가로/세로 중앙에 맞춤 | layout_alignTop | 기준 뷰와 위쪽을 맞춤 |
| layout_alignBottom | 기준 뷰와 아래쪽을 맞춤 | layout_alignLeft | 기준 뷰와 왼쪽을 맞춤 |
| layout_alignRight | 기준 뷰와 오른쪽을 맞춤 | layout_alignBaseLine | 기준 뷰와 텍스트 기준선을 맞춤 |
<?xml version="1.0" encoding="utf-8"?>
<RelativeLayout xmlns:android="http://schemas.android.com/apk/res/android"
    xmlns:app="http://schemas.android.com/apk/res-auto"
    xmlns:tools="http://schemas.android.com/tools"
    android:layout_width="match_parent"
    android:layout_height="match_parent"
    android:padding="10dp"
    tools:context=".MainActivity">

    <TextView
        android:id="@+id/textView"
        android:layout_width="wrap_content"
        android:layout_height="wrap_content"
        android:layout_alignParentLeft="true"
        android:layout_alignParentTop="true"
        android:text="아이디"
        android:textAppearance="@style/TextAppearance.AppCompat.Large" />

    <EditText
        android:id="@+id/editTextText"
        android:layout_width="wrap_content"
        android:layout_height="50dp"
        android:layout_below="@id/textView"
        android:layout_alignParentLeft="true"
        android:layout_alignParentRight="true"
        android:layout_marginTop="20dp"
        android:ems="10"
        android:hint="아이디를 입력하세요"
        android:inputType="text" />

    <TextView
        android:id="@+id/textView2"
        android:layout_width="wrap_content"
        android:layout_height="wrap_content"
        android:layout_below="@id/editTextText"
        android:layout_alignParentLeft="true"
        android:layout_marginTop="20dp"
        android:text="비밀번호"
        android:textAppearance="@style/TextAppearance.AppCompat.Large" />

    <EditText
        android:id="@+id/editTextText2"
        android:layout_width="wrap_content"
        android:layout_height="50dp"
        android:layout_below="@id/textView2"
        android:layout_alignParentLeft="true"
        android:layout_alignParentRight="true"
        android:layout_marginTop="20dp"
        android:ems="10"
        android:hint="비밀번호를 입력하세요"
        android:inputType="text" />

    <Button
        android:id="@+id/button5"
        android:layout_width="wrap_content"
        android:layout_height="wrap_content"
        android:layout_below="@id/editTextText2"
        android:layout_alignParentRight="true"
        android:layout_marginTop="20dp"
        android:layout_marginRight="20dp"
        android:text="취소" />

    <Button
        android:id="@+id/button6"
        android:layout_width="wrap_content"
        android:layout_height="wrap_content"
        android:layout_below="@id/editTextText2"
        android:layout_marginTop="20dp"
        android:layout_marginRight="20dp"
        android:layout_toLeftOf="@id/button5"
        android:text="로그인" />
</RelativeLayout>
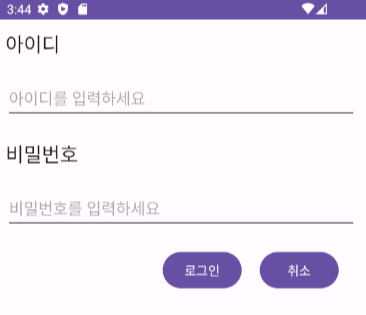
위 화면 구성에서 상단에 위치한 TextView의 경우 layout_alignParentLeft와 layout_aligntParentTop 속성 값을 true로 지정해 레이아웃의 좌측 상단에 위치시켰다.
그 아래의 EditText는 TextView 바로 아래 위치해야하기 때문에 layout_below 속성 값을 TextView의 ID로 지정했다.
또 하단의 로그인 버튼은 취소 버튼 옆이면서 비밀번호 입력칸 아래 위치해야하므로, layout_toLeftOf 속성 값을 취소 버튼 ID로 지정했고 layout_below 속성 값을 비밀번호 입력칸 ID로 지정했다.
여기서 margintTop 속성을 없애고 alignTop을 취소 버튼에 맞춘다면 위와 다른 방법으로 동일한 위치에 정렬이 가능하다.
<Button
    android:id="@+id/button6"
    android:layout_width="wrap_content"
    android:layout_height="wrap_content"
    android:layout_alignTop="@id/button5"
    android:layout_marginRight="20dp"
    android:layout_toLeftOf="@id/button5"
    android:text="로그인" />
뷰 속성에 쓰인 layout_margin은 뷰의 외부 공간 여백을 설정하는 속성이다.
3. ConstraintLayout
ConstraintLayout은 androidx에서 제공하는 라이브러리로, 다른 뷰에 상대적인 위치를 지정한다는 점이 RelativeLayout과 비슷하지만 지정해야하는 조건이 다르다.
RelativeLayout으로 구성했던 UI를 ConstraintLayout으로 구성해보면
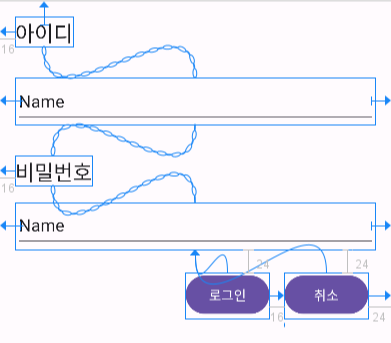
레이아웃 편집기에서 위와 같은 줄들을 볼 수 있다.
ConstraintLayout에서는 뷰에 제약 조건을 지정해줘야 한다. 부모 영역에서 어느 영역에 출력되야 하는지나 다른 뷰를 기준으로 했을 때의 상대위치가 제약조건에 해당한다.

위치를 지정할 뷰를 클릭하면 사방에 동그라미 표시가 생기는데 이를 드래그하여 상대 위치를 지정할 뷰나 레이아웃에 연결하면 제약조건이 설정된다.
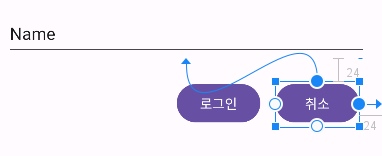
로그인 화면의 취소 버튼은 위쪽과 오른쪽 동그라미가 각각 editText와 ConstraintLayout에 연결되어 있다.
버튼을 editText의 아래에 위치시키기 위해 editText 하단 동그라미에 버튼의 상단 동그라미를 연결시킨 것이다.
또, 레이아웃 우측에 정렬시키기 위해 버튼 우측 동그라미를 ConstraintLayout에 연결시키고 간격을 지정해줬다.

취소 버튼의 코드에도 constraintEnd_toEndOf 속성과 constraintTop_toBottomOf 속성이 잘 지정된 것을 확인할 수 있다.
4. IncludeOtherLayout
IncludeOtherLayout은 하나의 레이아웃에 다른 레이아웃들을 포함시키는 개념이다.
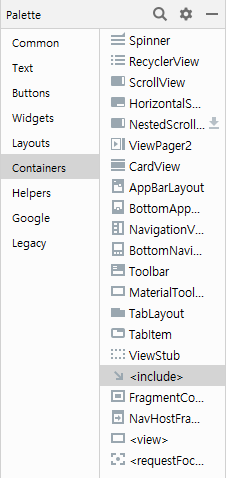
레이아웃 편집기 팔레트에는 Containers 하위에 Include 라는 이름으로 존재한다.
이미 생성된 레이아웃 파일 이름을 include 뷰 속성에 지정하면 해당 뷰에 하위 레이아웃이 포함된다.
<include
        android:id="@+id/secondLayout"
        layout="@layout/second"
        android:layout_width="match_parent"
        android:layout_height="wrap_content" />
include 뷰의 layout 속성 값으로 "@layout/second"가 입력되어있다.
포함하려는 레이아웃 파일의 이름이 "second.xml"이기 때문에 second라는 이름이 지정된 것이다.
include 뷰를 사용하면 여러 화면에서 공통적으로 보여져야하는 부분을 하나의 레이아웃을 통해 재사용할 수 있다.
'Android > 개념' 카테고리의 다른 글
| [Android] ImageView (0) | 2023.06.20 |
|---|---|
| [Android] ScrollView (0) | 2023.06.15 |
| [Android] TextView와 EditText (0) | 2023.06.15 |
| [Android] View Binding과 예제 (0) | 2023.06.07 |
| [Android] 안드로이드 앱 구성 파일 (0) | 2023.06.07 |


